Showing posts with label knitting lace. Show all posts

Saturday, August 22, 2015

Free Knitting Pattern! Stringy Cowl

This cowl is a piece of cake, knit flat and joined in the round at the end with either a sewn seam OR a 3-needle bind off.  Stitches consist of knits, knit 2 together, yarn overs, and very few purls.  You repeat the same rows over and over.  Maybe a little boring but makes for a fast project, great road trip project, or something to pick up whenever you feel like it and resume with no problem.
The "Stringy" fringe is made simply at the end with dropped stitches - no need to cut fringe and tie on.
To Download, View, or Print scroll all the way down past the bottom group of photos and click on the link to the PDF file.
Happy Knitting!


Materials and Tools: 

  • U.S. Size 8 (5mm) knitting needles
  • OPTIONAL for those using the provisional cast on.  An extra knitting needle to be used for the 3-needle bind off.  (size doesn't matter too much, anything between a 6 - 8)
  • Yarn - Sport weight, approx. 250 yds. (I like cotton or cotton blends myself for drapey-ness).
  • OPTIONAL: A little waste yarn in a contrast color for provisional cast on.
  • 2 stitch markers (Optional - if you want to mark the 3 edge sts on each side)

Gauge:

20 sts & 22 rows in stockinette stitch = 4"


Abbreviations:

K = knit
P = purl
yo = yarn over
k2tog = knit 2 together
RS = right side
WS = wrong side

References:

Provisional cast-ons: (here are a few different methods)
 https://www.youtube.com/watch?v=_T7OwOpC6CY
https://www.youtube.com/watch?v=-irRySJHCKE

3-needle bind off:  https://www.youtube.com/watch?v=wpJUrCX52DU


Tips:

Don't forget your yarn overs before each k2tog. If you forget one your stitch count will be off.
Also be careful NOT to do a yarn over at the end of the row (before the last 3 sts) as this will add an extra stitch and again your count would be off.  Yarn overs are only done before the k2tog's. 

Directions:

**Choose now whether you’d like to make this by starting with a provisional cast-on, which means you will join at the end with a 3-needle bind off,  OR you can just choose a regular cast-on method of your choice, then bind off at the end and sew your seam.
 

Set up:
For Provisional Cast-on (this means you will use a 3-needle bind off at the end) Using waste yarn perform a provisional cast on of your choice, cast on 68 Sts.
For Regular Cast on (this means you will sew your seam at the end.)  Using main yarn, cast on 68 sts using any regular cast on method you prefer.  I myself prefer the long-tail cast on.


With main yarn now:
1. Knit
2. Purl

Pattern rows: (To see a video of pattern rows 1&2 go here) https://youtu.be/TMRYk2aYVJg 

1. (RS) k3, *yo, k2tog*, repeat from * to * (do not yo after that last k2tog!!) until last 3 stitches, k3.
2. (WS) p3, *yo, k2tog*, repeat from * to * (do not yo after that last k2tog!!) until last 3 stitches, p3.

*OPTIONAL:  Place stitch markers after your 3 edge sts at the beginning and before the 3 edge sts at the end.  

Repeat the Pattern rows 1 and 2 until your piece measures 30" from first row, ending with row 2.

Knit one row.

Seaming:  
For those who used a Provisional Cast-on:
Using spare knitting needle, pick up the 68 stitches from the cast on, set aside.

Now, on the end that was the last row you worked, p3 sts, then k1, then place the last st worked back on the left hand needle, drop the other 3 sts off the needle (yep, let 'em drop off the needle, this will become your fringe later) then place that st that you worked (the 4th one) back on the right needle.  On the spare needle, the one with the sts you picked up from the provisional cast on, hold it parallel to the other working needle, right sides together, drop the first 3 sts off the needle.  Now knit a stitch from the provisional cast on side, now you have 2 sts on your right hand needle, pass st 1 over st 2.
Now perform a 3-needle bind off, when you get to the last 3 stitches (on both needles), stop, and let them drop off (again, this will become fringe).  Tie off on the last st worked and weave in end.

For those who used a regular Cast-on:

P3, k1,  k the next st, pass the 4th st on right needle over the 5th one as to bind off, place the new stitch you just made when you bound it off onto the left hand needle, drop those 3 edge sts off of the right hand needle, now place the st that you set onto the left needle back onto the right needle, continue to bind off until 3 sts remain on each needle, drop these last 3 sts on each needle (these will become fringe also).  Cut yarn, tie off and weave in.  Sew your bind off edge to the cast on edge (except those 3 edge stitches on each side which are dropped - don't sew those, they need to stay loose and dropped to pull the fringe.

To make the fringe, start gently tugging at an end where 3 sts were dropped, until a loop works its way out, when one loop comes out tug the next one.  A video showing this is here:
https://www.youtube.com/watch?v=UtUHcyS-0Jc

My cowl was 15.5" wide x 14.75" tall.  (height was measured fringe to fringe.)
You can certainly use different weight yarn, different size needles, add more stitches to get more width (just make sure you are using multiples of 2 plus 6 stitches for the edge sts.) your results in size will vary but do it the way you want it!  :)

I did not block mine, I simply put them in the washing machine and the dryer, and wore them the way they came out.  I love the crazy stringy fringe. 


To Download, View, or Print this pattern, click on the link below for the PDF file:
https://drive.google.com/file/d/0B_oZ8-XeMq3pMlN6VHpZamZHTms/view?usp=sharing


Back to Pattern Index

Friday, February 14, 2014

Occasional Cable Cowl - FREE Knitting Pattern!

As many of you know, I really really like this simple lace pattern.  It is a 2-row repeat, I have used it on a couple of my scarf/cowl patterns.  This time I wanted to see what it would be like if I threw in an occasional cable.
This cowl, although more decorative, does add some warmth around the neck.  I was traveling when I knit this and all I had to use was Red Heart yarn - needless to say not my favorite yarn or preferred in any way.  But, it did turn out and looks quite nice and I already have someone begging to have it.
Mine was 22" in circumference prior to blocking but after blocking grew significantly to 26" in circumference.  I was happy about this as I like it a bit wider so it will drape and look nice.
Here is the pattern if you want to give it a try!


*If you'd like to download or print the pattern just scroll down past the pictures and you will see a link where you can do that.

Materials:

Aran weight yarn 175 yds
Size 10 (6mm) circular needle (24” length)
1 Cable needle
5 stitch markers (I used 4 that were the same color to mark where cables are, and the other marker was a different color to mark the beg of the round).

Gauge:

14.5 sts & 20 rows = 4" in stockinette st.

Abbreviations:

K = knit                                P = purl
beg = beginning                   M = marker
yon = yarn over needle        yo = yarn over
p2tog = purl 2 together        Rep = repeat
k2tog = knit 2 together        CO = cast on
SM = slip marker                 PM = Place marker
CF2= Cable forward 2
**IMPORTANT: please make sure you know the difference between yo & yon.  If not, google it or watch some youtube videos, it's important that you do the correct one.

DIRECTIONS:

Using Long Tail cast on method, CO 80 sts

1.     Place marker to mark beg of round, Knit one round. (this first round may be a little tight, it will get better after a few rounds).
2.  P16, *PM, k4, p16, rep from * to last 4 sts, k4.

Slip markers as you come to them.  Please note: make sure on the purl rounds that the yo falls before the marker, not after.

3.     *yo, k2tog, k2, rep from * to M, k4,**.  Rep from * to ** to end of round.

4.     *P2, p2tog, yon, rep from * to 4 sts before marker, p2, p2tog, yo, (yes, I said yo instead of yon, this is correct) SM, k4, **.  Rep from * to ** to end of round.


5.     *yo, k2tog, k2, rep from * to M, k4,**.  Rep from * to ** to end of round.

6.     *P2, p2tog, yon, rep from * to 4 sts before marker, p2, p2tog, yo, SM, k4, **.  Rep from * to ** to end of round.

7.     *yo, k2tog, k2, rep from * to M, k4, **.  Rep from * to ** to end of round.

8.     *P2, p2tog, yon, *p2, p2tog, yon, rep from * to 4 sts before marker, p2, p2tog, yo, SM, k4, **.  Rep from * to ** to end of round.

9.     *yo, k2tog, k2, rep from * to M, CF2, **.  Rep from * to ** to end of round.

10. *P2, p2tog, yon, rep from * to 4 sts before marker, p2, p2tog, yo, SM, k4, **.  Rep from * to ** to end of round.

11. Work rounds 3-10 until piece measures approx. 10” or 7 cables have been completed.  End with round 10.

12. Work rounds 3-7.

13. Same as round 2, remove cable markers as you come to them as they are no longer needed.

14. Knit one round.

Bind off.  I blocked mine and it grew a bit.  Unblocked measured 22” in circumference and 11” in height.   Blocked mine measured 25" in circumference.


To Download or Print this pattern, click on the link below:

Tuesday, December 3, 2013

Free Knitting Pattern! - Bridger Cowl

This cowl is SUPER fast, uses worsted weight or Aran yarn and a U.S. size 10 circular needle. You begin the cowl in the center front and work flat while making the simple repeating lace pattern, then you will join and work in the round. This cowl is warm, squishy and makes a wonderful gift or craft fair item.  Make one (or two!) in a day.
If you want to download/print pattern you can scroll down past the pictures and it is available there too. (English, Spanish, Polish and Portuguese versions).


Tools / Materials:

Worsted or Aran weight yarn, approx. 150 yds.
U.S. size 10 (6mm) circular needle.  (I used a 24" length)

Gauge:

14 sts / 20 rows = 4" in stockinette st.


Abbreviations:

K=Knit
P=Purl
CO=Cast on
yo=yarn over
rep=repeat
sts=stitches
PM=place marker
RM=remove marker
beg=beginning

Reference: 

Cast on at beginning of the row, otherwise
known as the knitted cast-on.  Tutorial Video here: 
http://www.youtube.com/watch?v=rdaZTBOJ7XU  


Directions:

You will start out working flat (back and forth), later at #20, you will join and begin working in the round.


1.  CO 4 sts using long tail cast on. *note you will use the Long-tail cast-on here only, for the rest of the pattern when you cast on at the beg of the row, please do as directed.  Please see reference above for video.
2. Knit
3. CO 4 sts @ beg of row, k4, yo, k2tog, k2.   (8 sts)
4. CO 4 sts @ beg of row, k4,* yo, k2tog, k2, rep from * to end.  (12 sts)
5-14. Rep row 4 until you have 52 sts.
15. CO 4 sts @ beg of row, K4, *yo, k2tog, k2, rep from * 1x more, PM, k until last 12 sts,*yo, k2tog, k2, rep from * to end.  (56 sts)
16. CO 4 sts @ beg of row, K4, *yo, k2tog, k2, rep from * 1x more, PM, k until last 12 sts, RM, *yo, k2tog, k2, rep from * to end.  (60 sts)
17-19. Repeat row 16 until you have 72 sts. 
Place marker and join, you are now working in the round.
20. Purl round. (remove other marker when you come to it.  You will now only need the marker that marks the beginning of your circle).
21.  Knit every row until pc measures 11” (measure from cast on point to needle).
22. Purl round.
23. Knit round.
24. Purl round.
25-26 Rep rows 23 & 24 once more.
27. Bind off knitwise.

* Blue varigated yarn is Jojoland Fantasia.  the green is Berroco Remix. 


To get a printable pattern, click on the link below, then choose your language


Back to Pattern Index


Monday, September 30, 2013

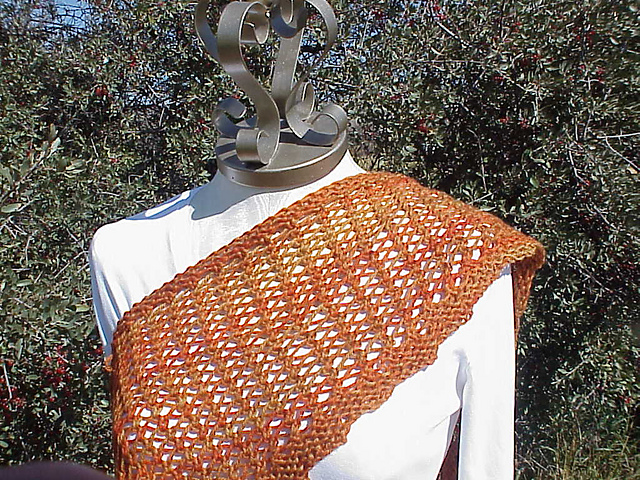
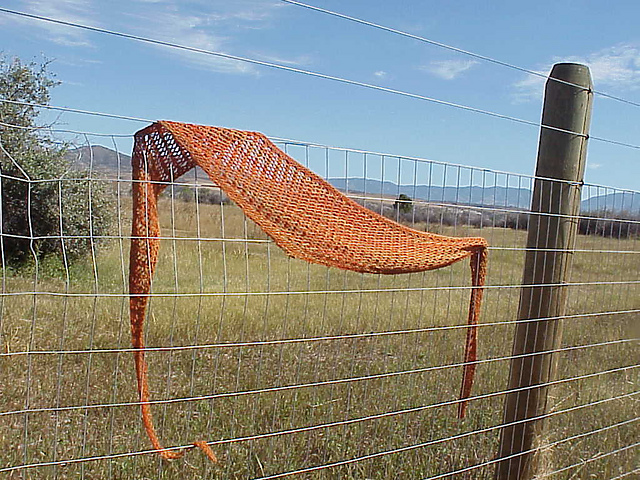
Free Knitting Pattern! Definitely Diagonal Scarf

It is has been chilly and rainy here for about a week now. I am in the middle of making my son a felted Irish hat - wanted a break from that so I whipped out another scarf pattern. This one is for myself, I love the look and the feel of it. I used 250-253 yds of Plymouth "Sweet Caroline" which is 100% cotton. It is very soft and drapey, just the way I like my scarves.  On the next one I make I may try a yarn where the color is changing like Knitpicks Chroma, I think that would look nifty with the diagonals.
Photos are at the bottom as well as the pattern if you'd like to download.

Definitely Diagaonal Scarf 

by Kris Basta  

Materials: 

Worsted weight yarn 253 yds
U.S. size 10 circular needle  

Gauge: 

 3.5 sts per inch in Garter St.  

Abbreviations: 

K = knit
P = purl
K2tog = knit 2 tog
rep = repeat
yo = yarn over
Kfb = knit in front and back of st to increase  

Reference: 

Casting on at the beginning of the row, otherwise known as “knitted cast-on”. Video reference is here: http://www.youtube.com/watch?v=rdaZTBOJ7XU
 

Directions: 

Using Long-tail cast on, cast on 7 sts
Begin set-up rows:

NOTE: these 3 rows will only be worked once. 
1. K2tog, yo, k5.
2. P2, *k3, p2
3. K4, k2tog, yo, k1

Now skip to row 4 below, work rows 4 – 16 of the Pattern Rows below.  NOTE this will only be done once.

PATTERN ROWS: 

1. K2tog, yo, *k3, k2tog, yo; rep from * to last 5 sts, k5.
2. P2, *k3, p2; rep from * to end.
3. K4, k2tog, yo, *k3, k2tog, yo; rep from * to last st, k1.
4. Cast on 5 sts @ beg of the row, k1, *p2, k3; rep from * to last st, p1. 12 sts 
5. Cast on 5 sts @ beg of the row, *k3, k2tog, yo; rep from * to last 2 sts, k2. 17 sts 
6. K2, *p2, k3; rep from * to end.
7. K2, *k2tog, yo, k3; rep from * to end.
8. *K3, p2; rep from * to last 2 sts, k2.
9. Cast on 5 sts @ beg of the row, K1, K2tog, yo, *k3, k2tog, yo; rep from * to last 4 sts, k4. 22 sts 
10. Cast on 5 sts @ beg of the row, P1, *k3, p2; rep from * to last st, k1. 27 sts 
11-13 Knit
14. Cast on 5 sts @ beg of the row, K to end. 32 sts 
15. Cast on 5 sts @ beg of the row, K to end. 37 sts
16. After completing row 15, start over with row 1 of the 16-row-stitch pattern, and work rows 1-16
      4X more. 157 sts 
17. Work pattern rows 1-10. 177 sts.
18. Kfb, K across to last 2 sts, Kfb, K1. 179 sts
19. Knit
20. Repeat 18 & 19 once more. 181 sts
21. Repeat 18 once more. 183 sts
22. Bind off.

 Unblocked measurement: 60” L x 13.5” W
(Lightly) Blocked measurement: 70” L x 14” W


Here is the pattern

Click on the link below, you should be able to download or print from there by clicking on "File".  If this does not work for you you may try switching from Firefox to Internet Explorer or vice versa.  Worst case senario you can copy and paste the directions into a word doc and print it out.  Enjoy!

https://drive.google.com/file/d/0B_oZ8-XeMq3pdm5aU3JpLW5xRzQ/view?usp=sharing

Back to Pattern Index


Saturday, September 14, 2013

Free Knitting Pattern! Wiggle Lace Scarf

  I call this one the "Wiggle Lace" Scarf.  It is a simple 4 row pattern repeat


 Materials Needed:

1 skein of worsted weight yarn, approx. 200 yds.
Size 10 1/2 (6.5mm) circular Knitting needle.  You will use a circular not to knit in the round, but to work flat and accomodate the large number of stitches.  I used a 29" length.

Abbreviations:
K = Knit
P=Purl
CO = Cast on
YO = Yarn over
K2tog = Knit 2 together

Gauge: 

3.5 sts per 1 inch

References:

Cast on at beginning of the row, otherwise known as knitted cast-on.  Tutorial here:
http://www.youtube.com/watch?v=rdaZTBOJ7XU

Directions:

1. CO 8 sts using long-tail cast on method.
2. Knit

3.  (RS) *K2, P1, YO, K2tog, P1; rep from * to last 2 sts, K2.
4.  CO 6 sts at the beg. of the row, P2, *K1, P2; rep from *.
5.  CO 6 sts at the beg. of the row, *K2, P1, K2tog, YO, P1, rep from * to last 2 sts, K2.
6.  P2, *K1, P2; rep from *

7.  Repeat rows 3 - 6 until you have 188 sts.
8.  Bind off as K2, P1.

My finished and (lightly) blocked scarf measured 68" L x 10" W.

Pattern can be downloaded, see at the bottom of this post (after all the photos).


Here is the pattern

Click on the link below, you should be able to download or print from there by clicking on "File".  If this does not work for you you may try switching from Firefox to Internet Explorer or vice versa.  Worst case senario you can copy and paste the directions into a word doc and print it out.  Enjoy!

https://docs.google.com/file/d/0B_oZ8-XeMq3pU1RjeHFlbHdOeDg/edit?usp=drive_web

Back to Pattern Index

Tuesday, September 10, 2013

New Knitting Pattern! Quite Simply...Scarf


 ©2013 Kris Basta

My last three scarves (on this blog) are all constructed similarly with easy pattern repeats.  This is the same but with only a 1 row repeat worked over and over.  Super simple, easy enough for the most beginner, AND good looking enough that even the more advanced knitter will enjoy whipping one up. 

Here it is: 


Materials: 

I skein of worsted weight yarn, approx. 200 yds.  
Size U.S. 10 1/2 (6.5mm) circular knitting needle.  You will use a circular needle not to knit in the round, but to work flat and accomodate the large number of stitches.  I used a 29" length. 
2 stitch markers 


Abbreviations: 

K= Knit
P = Purl
CO = Cast on
YO = Yarn over
PM = Place Marker
RM = Remove Marker
K2tog = Knit 2 sts together


References:

Cast on at the beginning of the row, otherwise known as knitted cast-on.  Tutorial video here: http://www.youtube.com/watch?v=rdaZTBOJ7XU

Gauge:

14 sts in Garter st = 4"

Directions:

1. Using long-tail cast on, cast on 4 sts.
2. Knit
3. CO 4 sts at the beg of the row, knit to end.
4. Repeat step 3 until there are 36 sts.
5. CO 4 sts at the beg of the row, K16, PM, K1, *YO, K2tog, repeat from * twice more, K17.
6. CO 4 sts at the beg of the row, K16, PM, K1, *YO, K2tog, repeat from * to 1 st before marker, K1, RM, K16. 
7. Repeat step 6 until you have 192 sts.
8. CO 4 sts at the beg of the row, K across removing marker as you come to it. 196 sts.
9. Repeat step 8.  200 sts.
10. Do not cast on at the beg of the row(s), Knit 2 rows.
11. Bind off loosely.


1. 


Here is the pattern

 Click on the link below - You should be able to download or print from there by clicking on "File".  If this does not work for you you may try switching from Firefox to Internet Explorer or vice versa.  Worst case senario you can copy and paste the directions into a word doc and print it out.  Enjoy!

https://docs.google.com/file/d/0B_oZ8-XeMq3pdE1kRUpxWVNRTFU/edit?usp=drive_web

Back to Pattern Index