Friday, February 14, 2014

Occasional Cable Cowl - FREE Knitting Pattern!

As many of you know, I really really like this simple lace pattern.  It is a 2-row repeat, I have used it on a couple of my scarf/cowl patterns.  This time I wanted to see what it would be like if I threw in an occasional cable.
This cowl, although more decorative, does add some warmth around the neck.  I was traveling when I knit this and all I had to use was Red Heart yarn - needless to say not my favorite yarn or preferred in any way.  But, it did turn out and looks quite nice and I already have someone begging to have it.
Mine was 22" in circumference prior to blocking but after blocking grew significantly to 26" in circumference.  I was happy about this as I like it a bit wider so it will drape and look nice.
Here is the pattern if you want to give it a try!


*If you'd like to download or print the pattern just scroll down past the pictures and you will see a link where you can do that.

Materials:

Aran weight yarn 175 yds
Size 10 (6mm) circular needle (24” length)
1 Cable needle
5 stitch markers (I used 4 that were the same color to mark where cables are, and the other marker was a different color to mark the beg of the round).

Gauge:

14.5 sts & 20 rows = 4" in stockinette st.

Abbreviations:

K = knit                                P = purl
beg = beginning                   M = marker
yon = yarn over needle        yo = yarn over
p2tog = purl 2 together        Rep = repeat
k2tog = knit 2 together        CO = cast on
SM = slip marker                 PM = Place marker
CF2= Cable forward 2
**IMPORTANT: please make sure you know the difference between yo & yon.  If not, google it or watch some youtube videos, it's important that you do the correct one.

DIRECTIONS:

Using Long Tail cast on method, CO 80 sts

1.     Place marker to mark beg of round, Knit one round. (this first round may be a little tight, it will get better after a few rounds).
2.  P16, *PM, k4, p16, rep from * to last 4 sts, k4.

Slip markers as you come to them.  Please note: make sure on the purl rounds that the yo falls before the marker, not after.

3.     *yo, k2tog, k2, rep from * to M, k4,**.  Rep from * to ** to end of round.

4.     *P2, p2tog, yon, rep from * to 4 sts before marker, p2, p2tog, yo, (yes, I said yo instead of yon, this is correct) SM, k4, **.  Rep from * to ** to end of round.


5.     *yo, k2tog, k2, rep from * to M, k4,**.  Rep from * to ** to end of round.

6.     *P2, p2tog, yon, rep from * to 4 sts before marker, p2, p2tog, yo, SM, k4, **.  Rep from * to ** to end of round.

7.     *yo, k2tog, k2, rep from * to M, k4, **.  Rep from * to ** to end of round.

8.     *P2, p2tog, yon, *p2, p2tog, yon, rep from * to 4 sts before marker, p2, p2tog, yo, SM, k4, **.  Rep from * to ** to end of round.

9.     *yo, k2tog, k2, rep from * to M, CF2, **.  Rep from * to ** to end of round.

10. *P2, p2tog, yon, rep from * to 4 sts before marker, p2, p2tog, yo, SM, k4, **.  Rep from * to ** to end of round.

11. Work rounds 3-10 until piece measures approx. 10” or 7 cables have been completed.  End with round 10.

12. Work rounds 3-7.

13. Same as round 2, remove cable markers as you come to them as they are no longer needed.

14. Knit one round.

Bind off.  I blocked mine and it grew a bit.  Unblocked measured 22” in circumference and 11” in height.   Blocked mine measured 25" in circumference.


To Download or Print this pattern, click on the link below:

Sunday, January 19, 2014

Free Knit Pattern! 2-Needle Boot Toppers / Cuffs

I think boot toppers/cuffs are pretty darn cute.  They close the gap between the top of your boot and your pants that are tucked in (or leggings), and add an element of design.
I had never made any and decided to see if my daughter wanted a pair.  She did, so I whipped these out.  I have no adversity whatsoever to double point needles, but I know some folks do.  I wanted to write the easiest pattern I could just to tempt people to try it, so these are made on 2 regular needles.
For downloading or printing of this pattern, simply scroll down past the photos, the pattern is there.  *Special thanks to my Ravelry tester Karinamaza for letting me use her picture of the gray/blue toppers.  ☺
Here are my 2-needle boot toppers.....

Sizes: Sm(Med, Lg/XL) 

Sm = up to 13” calf width, Med = up to 14” calf width, Lg/Xl = up to 15” calf width. 

Materials:  

Worsted weight or Aran yarn 110(130,150) yds.
A few yards of waste yarn
1 set of U.S. size 8 (5mm) needles
1 extra needle either size 7 or 8 (for 3-needle bind off at the end.)

Gauge:

18 sts & 36 rows  = 4” in Garter st.


Abbreviations:

k = knit                                p = purl 
rep = repeat                          CO = cast on       
sts = stitches

References:

3-needle bind off: 

DIRECTIONS:

To begin, first choose what length you would like your toppers to be.  Since you are working sideways the length will be determined by the amount of stitches you cast on.  28 sts will be 6.2” long.  33 sts will be 7.3 “ long.  38 sts will be 8.4” long.  *The toppers shown are 28 sts.

Using Waste yarn CO your chosen amount of sts. 
Still using waste yarn, knit one row, then purl one row.  OR You may use a provisional cast on method if you prefer something else.
Now join main color yarn.

1. (RS) Using Main Color: Knit
2. (WS) K4, *k1, p4, rep from* to last 4 sts, k4.
3. (RS) K4, *k3, p2, rep from * to last 4 sts, k4.
4. (WS) K4, *k3, p2, rep from * to last 4 sts, k4.
5. (RS) K4, *K1, p4, rep from * to last 4 sts, k4.
6. (WS) Knit
7. Rep rows 1-6  ten(eleven, twelve) times more – on the last rep of rows,
stop at row 5.
8. Now grab your other needle and pick up the original stitches being held by the waste yarn.     Remove waste yarn. 
9. Fold your knitting RIGHT sides together, Use 3-needle bind off method to bind off knitwise.

Cut yarn and weave in end.   Make second topper the same way.


Monday, January 6, 2014

Free Crochet Pattern - Yorkville Cowl

I grew up in the town of Yorkville (Illinois).  When I was a kid, in the 70's, the population was around 1900.  It was a small farm town.  Many things have changed, the population is now 17,000+.  I loved growing up where I did, just outside of town surrounded by corn fields.  In the summer we'd catch lightning bugs, swim in the creeks, play in woods, and play ghost in the graveyard as the sun was setting.  My family moved to Montana just before I turned 18.  I have now lived in Montana the majority of my life and love it, but oddly I still consider myself a Midwesterner. 
As a kid I was always crafting, always making something.  I had a miniature version of my mom's singer sewing machine - many Barbie cloths were crafted on it.  I had decided one day to learn to crochet.  My mom had a "learn to crochet" booklet from either leisure arts or red heart, I forget.  I studied it and taught myself (with a little help from my Aunt Joan).  I made many afghans, scarves, hats, Christmas ornaments and yes, even doilies.
I find today that I knit more than I crochet, but every once in a while I feel great satisfaction picking up the hook and going back to my first craft.   I taught both my kids (boy and girl) how to crochet at an early age.  They are both grown now but can still crochet.  :)
In the last couple of weeks I have stuck close to home battling a bad cold and winter weather, it's given me plenty of time to crochet. Last week I made the "Bandito Cowl", this week I am making what I'll call the "Yorkville Cowl" as my hometown has been on my mind lately.


Wednesday, January 1, 2014

Free Crochet Pattern - Bandito Cowl

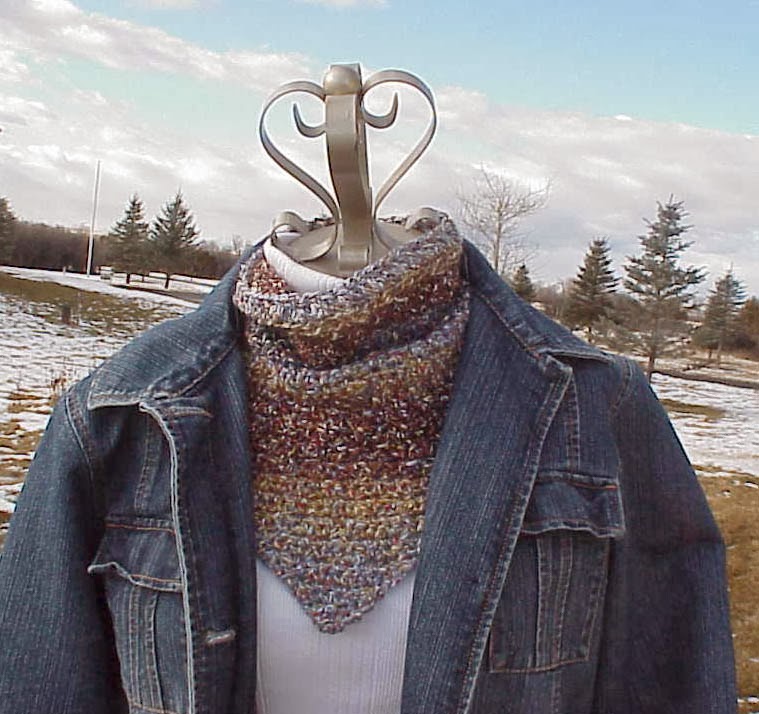
Happy New Year!  Darn tennis elbow has been killing me.  Can't knit for now, but for some reason crochet doesn't seem to bother it.  Decided to try to come up with a fun kerchief style cowl.  Here is what I came up with, I really like it.  I recommend using yarn with a little drape to it, a blend with some cotton or rayon for example.  If you would like to download or print the pattern, scroll down past the pictures to the link.

Materials:

150-170 yds of Worsted weight or Aran yarn
Size "I" (5.5mm) Crochet Hook 

Abbreviations:

ch= chain
sc= single crochet
dc= double crochet
rep=repeat

Gauge:

Gauge isn’t terribly important as you will work to a certain measurement, but my gauge was 3 scs per inch.

Directions:


  1. Ch 2, turn
  2. 2 sc in 2nd ch from hook, ch 2, turn.
  3. 2 sc in 2nd ch from hook, skip next sc, 2 sc in next sc, ch 2, turn.
  4. 2 sc in 2nd ch from hook, *skip next sc, 2 sc in next sc, rep from * to end, ch 2, turn. 
  5. Repeat row 4 until your piece is 19” wide, for me this was 76 sts.  Do not ch 2 at the end of the last row.
  6. Join in the round by slipping into the top of the first sc, ch 1, 2 sc in the same sc as joining, *skip next sc, 2 sc in next sc, rep from * around, skip last sc, then slip into first sc to end the round.
  7. Ch 1, 2 sc in same st as join, *skip next sc, 2 sc in next sc, rep from * around, skip last sc, then slip into first sc to end the round.
  8. Repeat round 7 until you have worked 3” above your initial joining in the round.
  9. Ch 1, sc in the same sc as join, then sc in the back loop only of every sc, finish round by slipping into the first sc.
  10. Ch 2 in same sc as join (this counts as first dc), dc in the back loop only in every sc, finish round by slipping into the top of the ch 2.
  11. Cut yarn and secure, weave in end.

Blocking is optional – I actually did not block mine and I am totally happy with it.  Suggestion: You can dress this cowl up a bit if you like by adding your favorite edging such as picots....etc.


To Download or print you can click on this link:

https://drive.google.com/file/d/0B_oZ8-XeMq3pT3pzN1Y3X3MwdlU/edit?usp=sharing

Back to Pattern Index


Thursday, December 5, 2013

Fingerless Mitts on my Knitting Machine

So I decided to make some fingerless mitts on my knitting machine for myself, daughter, and craft show fodder.

I found this pattern on ravelry:
http://www.ravelry.com/patterns/library/machine-knit-wristwarmers

I liked the pattern, it was very easy to follow and worked up quickly.  The only thing that gives me difficulty (no fault of the pattern) is the sew-as-you-go method when making the thumb.  For some reason I just cannot seem to do that very well.  I think I just can't see well enough and I am missing stitches.  

On my 3rd pair I decided to try the thumb a different way and I REALLY like it!  Here is what I did.

1. Take your finished (main part) of the mitt and fold right sides together.  Pin starting from 1 1/2" above the cuff ribbing and continue to pin together all the way down the cuff.


2.  Now here is the part that will make a lot of machine knitters cringe......sew from your first pin all the way down the cuff with your sewing machine.  Yep, that's right, your sewing machine.  Take as small of a seam as you can.  I can usually get about an 1/8" seam.  Make sure that you back stitch a couple of times at the beginning and the end of the seam.  Your mitt will now look like this:


3.  Now go back to your knitting machine, pull 17 sts on both sides of zero (total of 34).  Set machine to tension 5.
Take your now-seamed mitt, with wrong side of seam facing you, start hanging the mitt on the needles.  Hang sts evenly from the center outward, 17 on each side.
This picture shows the first stitch on either side of zero hung.


This shows all the stitches, 17 on each side of zero, hung on the machine, then push the mitt back past the latches against the bed.


4.  COR Using your main color, knit across.
5.  COL Set your machine to "Hold" and pull the Right needles 3-17 out in non-working position, knit across.
6.  COR Wrap R3, pull the Left needles 3-17 out into non-working position, knit across.
7.  COL Wrap L3, put R3 back into working position, knit across.
8.  COR Wrap R4, put L3 back into working position, knit across.
9.  COL Wrap L4, put R4 back into working position, knit across.
10.COR Wrap R5, put L4 back into working position, knit across.

Keep progressing in this manner until you have 4 sts left on either side and COL.

Wrap 2 sts this time, and put 2 sts on the other side back in work, knit across.
Repeat above until all sts are in work.  Knit one row.

Rib for 5 rows at tension 3. 
Bind off.

I then pin the remaining seam for top of mitt and thumb and again I sew this on my sewing machine.  For me this worked out great and thumb is a very nice fit!


Tuesday, December 3, 2013

Free Knitting Pattern! - Bridger Cowl

This cowl is SUPER fast, uses worsted weight or Aran yarn and a U.S. size 10 circular needle. You begin the cowl in the center front and work flat while making the simple repeating lace pattern, then you will join and work in the round. This cowl is warm, squishy and makes a wonderful gift or craft fair item.  Make one (or two!) in a day.
If you want to download/print pattern you can scroll down past the pictures and it is available there too. (English, Spanish, Polish and Portuguese versions).


Tools / Materials:

Worsted or Aran weight yarn, approx. 150 yds.
U.S. size 10 (6mm) circular needle.  (I used a 24" length)

Gauge:

14 sts / 20 rows = 4" in stockinette st.


Abbreviations:

K=Knit
P=Purl
CO=Cast on
yo=yarn over
rep=repeat
sts=stitches
PM=place marker
RM=remove marker
beg=beginning

Reference: 

Cast on at beginning of the row, otherwise
known as the knitted cast-on.  Tutorial Video here: 
http://www.youtube.com/watch?v=rdaZTBOJ7XU  


Directions:

You will start out working flat (back and forth), later at #20, you will join and begin working in the round.


1.  CO 4 sts using long tail cast on. *note you will use the Long-tail cast-on here only, for the rest of the pattern when you cast on at the beg of the row, please do as directed.  Please see reference above for video.
2. Knit
3. CO 4 sts @ beg of row, k4, yo, k2tog, k2.   (8 sts)
4. CO 4 sts @ beg of row, k4,* yo, k2tog, k2, rep from * to end.  (12 sts)
5-14. Rep row 4 until you have 52 sts.
15. CO 4 sts @ beg of row, K4, *yo, k2tog, k2, rep from * 1x more, PM, k until last 12 sts,*yo, k2tog, k2, rep from * to end.  (56 sts)
16. CO 4 sts @ beg of row, K4, *yo, k2tog, k2, rep from * 1x more, PM, k until last 12 sts, RM, *yo, k2tog, k2, rep from * to end.  (60 sts)
17-19. Repeat row 16 until you have 72 sts. 
Place marker and join, you are now working in the round.
20. Purl round. (remove other marker when you come to it.  You will now only need the marker that marks the beginning of your circle).
21.  Knit every row until pc measures 11” (measure from cast on point to needle).
22. Purl round.
23. Knit round.
24. Purl round.
25-26 Rep rows 23 & 24 once more.
27. Bind off knitwise.

* Blue varigated yarn is Jojoland Fantasia.  the green is Berroco Remix. 


To get a printable pattern, click on the link below, then choose your language


Back to Pattern Index


Tuesday, November 5, 2013

Free Knitting Pattern! Old Flames Scarf


 The flickering flames stitch pattern is nothing new, it's been used for many knit patterns.  I have incorporated it into this bottom-up triangular scarf.  You will start your scarf at the bottom center and work your way upwards while increasing every 3rd and 4th row.   This is not a difficult pattern at all, I rate it as intermediate simply because you do need to pay attention and check your stitch count.  It is always advisable to read thru the pattern before starting.  The pattern is available at the end (after the pics) to download or print.  Have fun!


Materials:

 220-230 yds of Worsted or Aran weight yarn, preferably something drapey.  Suggestions are blends that include cotton, rayon, silk, bamboo, etc.

Tools: 

One size U.S. #10 circular needle.
*Circular needle is to accommodate the large number of stitches, you will be knitting the scarf flat, not in the round.

Gauge:

Since this is a scarf, gauge isn't terribly important but there are two examples of ones I've made.  
Red Scarf - 12 sts/15 rows in Stst = 4".  This was w/ worsted weight yarn, using #10 needle.  this scarf is 77" L x 11" W.
Multi color scarf - 16 sts/20 rows in Stst = 4".  This was w/ Aran weight yarn using #10 needle.  This scarf is __L x __W. * I ran out of yarn, will post measures when I get another ball of yarn! 

IMPORTANT!


Please note that this scarf pattern begins at the bottom center of the scarf, you will be increasing every 3rd and 4th row.  Please use the cast-on at the beginning of the row method as shown in the video reference below.  If you try to make this and do your increases by casting on at the END of the row with a backward loop, it will not look nice, you will have an ugly looking edge.
Also, please note that some of the ssk’s in the beginning rows of the scarf seem a little bit awkward because you are making them in the sts that you have just cast on, don’t worry, this is ok.  This is not a hard pattern, it is one that just requires you to make sure your stitch count is correct.  I have noted the stitch counts at the end of the cast on rows.  

References/Tutorials

1. Cast on at beginning of the row, otherwise known as knitted cast-on. Tutorial video here:  
2. ssk (slip, slip, knit), here is a tutorial showing how to do this:
      http://www.youtube.com/watch?v=cLWaabNhcc0

Abbreviations: 

St = Stitch                    yo = yarn over
beg = beginning           K = Knit                      
BO = Bind off               CO = Cast on
K2tog = Knit 2 together
ssk = slip, slip, knit 


PATTERN:


Using Long tail cast on, Cast on 15 sts.

Row 1: (WS) k2, purl across to last 2 sts, k2.
Row 2: k5, *ssk, k5, yo, rep from * to last 3 sts, k3.

Row 3: CO 7 sts at beg of row, k2, purl across to last 2 sts, k2.  (22, 106, 190 sts)
Row 4: CO 7 sts at beg of row, K5, *ssk, k4, yo, k1, rep from * to last 3 sts, k3. (29, 113, 197 sts)

Row 5: k2, purl across to last 2 sts, k2.
Row 6: K5, *ssk, k3, yo, k2, rep from * to last 3 sts, k3.

Row 7: CO 7 sts at of beg of row, k2, purl across to last 2 sts, k2.  (36, 120, 204 sts)
Row 8: CO 7 sts at of beg of row, k5, *ssk, k2, yo, k3, rep from * to last 3 sts, k3. (43, 127, 211 sts)

Row 9: k2, purl across to last 2 sts, k2.
Row 10: k5, *ssk, k1, yo, k4, rep from * to last 3 sts, k3.

Row 11: CO 7 sts at beg of row, k2, purl across to last 2 sts, K2.  (50, 134, sts)
Row 12: CO 7 sts at beg of row, k5, *ssk, yo, k5, rep from * to last 3 sts, k3.  
(57, 141 sts)

Row 13: k2, purl across to last 2 sts, k2.
Row 14: k3, *yo, k5, k2tog, rep from * to last 5 sts, k5.

Row 15: CO7 sts at beg of row, k2, purl across to last 2 sts, K2.  (64, 148 sts)
Row 16: CO7 sts at beg of row, k4,*yo, k4, k2tog, k1, rep from * to last 4 sts, k4.  (71, 155 sts)

Row 17: k2, purl across to last 2 sts, k2.
Row 18: k5, *yo, k3, k2tog, k2, rep from * to last 3 sts, k3.

Row 19: CO7 sts at beg of row, k2, purl across to last 2 sts, K2.  (78, 162 sts)
Row 20: CO7 sts at beg of row, k6,*yo, k2, k2tog, k3, rep from * to last 2 sts, k2. (85, 169 sts)

Row 21: k2, purl across to last 2 sts, k2.
Row 22: k7,*yo, k1, k2tog, k4, rep from * across to last st, k1.

Row 23: CO7 sts at beg of row, k2, purl across to last 2 sts, K2.  (92, 176 sts)
Row 24: CO7 sts at beg of row, k8,*yo, k2tog, k5, rep from * across.  (99, 183 sts)

25-48: Repeat Rows 1-24 once more. (183 sts)
49-56: Repeat Rows 1-8.  (211 sts)
57-59: Knit each row, do not cast any sts on at beg of row.
60: Bind off (knitwise) loosely.


HERE IS THE PATTERN:

To download or print click on the link below.

https://drive.google.com/file/d/0B_oZ8-XeMq3pamFIcHVzOHBpa0k/edit?usp=sharing

Back to Pattern Index