Tuesday, November 5, 2013

Free Knitting Pattern! Old Flames Scarf


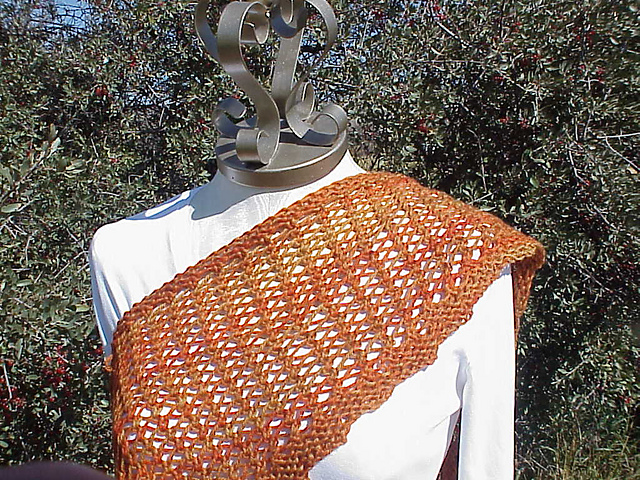
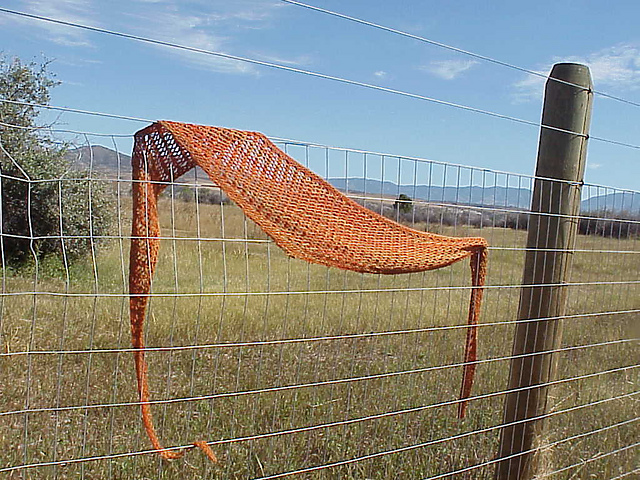
 The flickering flames stitch pattern is nothing new, it's been used for many knit patterns.  I have incorporated it into this bottom-up triangular scarf.  You will start your scarf at the bottom center and work your way upwards while increasing every 3rd and 4th row.   This is not a difficult pattern at all, I rate it as intermediate simply because you do need to pay attention and check your stitch count.  It is always advisable to read thru the pattern before starting.  The pattern is available at the end (after the pics) to download or print.  Have fun!


Materials:

 220-230 yds of Worsted or Aran weight yarn, preferably something drapey.  Suggestions are blends that include cotton, rayon, silk, bamboo, etc.

Tools: 

One size U.S. #10 circular needle.
*Circular needle is to accommodate the large number of stitches, you will be knitting the scarf flat, not in the round.

Gauge:

Since this is a scarf, gauge isn't terribly important but there are two examples of ones I've made.  
Red Scarf - 12 sts/15 rows in Stst = 4".  This was w/ worsted weight yarn, using #10 needle.  this scarf is 77" L x 11" W.
Multi color scarf - 16 sts/20 rows in Stst = 4".  This was w/ Aran weight yarn using #10 needle.  This scarf is __L x __W. * I ran out of yarn, will post measures when I get another ball of yarn! 

IMPORTANT!


Please note that this scarf pattern begins at the bottom center of the scarf, you will be increasing every 3rd and 4th row.  Please use the cast-on at the beginning of the row method as shown in the video reference below.  If you try to make this and do your increases by casting on at the END of the row with a backward loop, it will not look nice, you will have an ugly looking edge.
Also, please note that some of the ssk’s in the beginning rows of the scarf seem a little bit awkward because you are making them in the sts that you have just cast on, don’t worry, this is ok.  This is not a hard pattern, it is one that just requires you to make sure your stitch count is correct.  I have noted the stitch counts at the end of the cast on rows.  

References/Tutorials

1. Cast on at beginning of the row, otherwise known as knitted cast-on. Tutorial video here:  
2. ssk (slip, slip, knit), here is a tutorial showing how to do this:
      http://www.youtube.com/watch?v=cLWaabNhcc0

Abbreviations: 

St = Stitch                    yo = yarn over
beg = beginning           K = Knit                      
BO = Bind off               CO = Cast on
K2tog = Knit 2 together
ssk = slip, slip, knit 


PATTERN:


Using Long tail cast on, Cast on 15 sts.

Row 1: (WS) k2, purl across to last 2 sts, k2.
Row 2: k5, *ssk, k5, yo, rep from * to last 3 sts, k3.

Row 3: CO 7 sts at beg of row, k2, purl across to last 2 sts, k2.  (22, 106, 190 sts)
Row 4: CO 7 sts at beg of row, K5, *ssk, k4, yo, k1, rep from * to last 3 sts, k3. (29, 113, 197 sts)

Row 5: k2, purl across to last 2 sts, k2.
Row 6: K5, *ssk, k3, yo, k2, rep from * to last 3 sts, k3.

Row 7: CO 7 sts at of beg of row, k2, purl across to last 2 sts, k2.  (36, 120, 204 sts)
Row 8: CO 7 sts at of beg of row, k5, *ssk, k2, yo, k3, rep from * to last 3 sts, k3. (43, 127, 211 sts)

Row 9: k2, purl across to last 2 sts, k2.
Row 10: k5, *ssk, k1, yo, k4, rep from * to last 3 sts, k3.

Row 11: CO 7 sts at beg of row, k2, purl across to last 2 sts, K2.  (50, 134, sts)
Row 12: CO 7 sts at beg of row, k5, *ssk, yo, k5, rep from * to last 3 sts, k3.  
(57, 141 sts)

Row 13: k2, purl across to last 2 sts, k2.
Row 14: k3, *yo, k5, k2tog, rep from * to last 5 sts, k5.

Row 15: CO7 sts at beg of row, k2, purl across to last 2 sts, K2.  (64, 148 sts)
Row 16: CO7 sts at beg of row, k4,*yo, k4, k2tog, k1, rep from * to last 4 sts, k4.  (71, 155 sts)

Row 17: k2, purl across to last 2 sts, k2.
Row 18: k5, *yo, k3, k2tog, k2, rep from * to last 3 sts, k3.

Row 19: CO7 sts at beg of row, k2, purl across to last 2 sts, K2.  (78, 162 sts)
Row 20: CO7 sts at beg of row, k6,*yo, k2, k2tog, k3, rep from * to last 2 sts, k2. (85, 169 sts)

Row 21: k2, purl across to last 2 sts, k2.
Row 22: k7,*yo, k1, k2tog, k4, rep from * across to last st, k1.

Row 23: CO7 sts at beg of row, k2, purl across to last 2 sts, K2.  (92, 176 sts)
Row 24: CO7 sts at beg of row, k8,*yo, k2tog, k5, rep from * across.  (99, 183 sts)

25-48: Repeat Rows 1-24 once more. (183 sts)
49-56: Repeat Rows 1-8.  (211 sts)
57-59: Knit each row, do not cast any sts on at beg of row.
60: Bind off (knitwise) loosely.


HERE IS THE PATTERN:

To download or print click on the link below.

https://drive.google.com/file/d/0B_oZ8-XeMq3pamFIcHVzOHBpa0k/edit?usp=sharing

Back to Pattern Index

Sunday, October 20, 2013

Machine Knit Whisper Cowls w/ fringe


My daughter had told me that fringed scarves/cowls were really "in" right now and that she wanted me to make her some.
Here is what I came up with.

First, using my standard gauge (4.5mm) KH-965i and my garter carriage. I cast on 96 stitches with waste yarn, knit 6 rows with it.  Then I knit 500 rows with the scarf yarn at tension 9 using Pattern #493.  I then flipped it over with a garter bar, hung the beginning stitches onto the last working row and knit them together right side to right side.  Bound off, then fringed.  You fringe BOTH sides of the cowl tube.

Then I used my Bulky machine (9mm) Brother KH-260, Using 48 needles with Pattern card #2 and tuck stitch, at tension 5 or 6.  I cast on with waste yarn and knit 6 rows, then using my scarf yarn knit 330 rows.   I used the "wrong"side (tucked side) as my right side so I simply rehung the cast on stitches to my last row - therefore right side to right side, knit them together then bound off, then fringed.  You fringe BOTH sides of the cowl tube.

I used a variety of different yarns and sometimes I twisted 2 lighter weights together.  The size I was shooting for was anywhere from 10" - 12" wide by 52" in length.  I lightly steamed the cowls mostly just to pull the fringe out a little bit so it didn't curl inward.
These cowls are very light weight, soft, but warm and very pretty.  My daughter absolutely loves hers and I couldn't even get them back from her to photograph.   I made a few more that I am keeping myself (although she wants more!) and I think I will make some for a craft show in November as they are fast and easy.                                  

                                                               Back to Pattern Index
Here they are:

Made on KH-965i


 These were all made on the Bulky:


Monday, September 30, 2013

Free Knitting Pattern! Definitely Diagonal Scarf

It is has been chilly and rainy here for about a week now. I am in the middle of making my son a felted Irish hat - wanted a break from that so I whipped out another scarf pattern. This one is for myself, I love the look and the feel of it. I used 250-253 yds of Plymouth "Sweet Caroline" which is 100% cotton. It is very soft and drapey, just the way I like my scarves.  On the next one I make I may try a yarn where the color is changing like Knitpicks Chroma, I think that would look nifty with the diagonals.
Photos are at the bottom as well as the pattern if you'd like to download.

Definitely Diagaonal Scarf 

by Kris Basta  

Materials: 

Worsted weight yarn 253 yds
U.S. size 10 circular needle  

Gauge: 

 3.5 sts per inch in Garter St.  

Abbreviations: 

K = knit
P = purl
K2tog = knit 2 tog
rep = repeat
yo = yarn over
Kfb = knit in front and back of st to increase  

Reference: 

Casting on at the beginning of the row, otherwise known as “knitted cast-on”. Video reference is here: http://www.youtube.com/watch?v=rdaZTBOJ7XU
 

Directions: 

Using Long-tail cast on, cast on 7 sts
Begin set-up rows:

NOTE: these 3 rows will only be worked once. 
1. K2tog, yo, k5.
2. P2, *k3, p2
3. K4, k2tog, yo, k1

Now skip to row 4 below, work rows 4 – 16 of the Pattern Rows below.  NOTE this will only be done once.

PATTERN ROWS: 

1. K2tog, yo, *k3, k2tog, yo; rep from * to last 5 sts, k5.
2. P2, *k3, p2; rep from * to end.
3. K4, k2tog, yo, *k3, k2tog, yo; rep from * to last st, k1.
4. Cast on 5 sts @ beg of the row, k1, *p2, k3; rep from * to last st, p1. 12 sts 
5. Cast on 5 sts @ beg of the row, *k3, k2tog, yo; rep from * to last 2 sts, k2. 17 sts 
6. K2, *p2, k3; rep from * to end.
7. K2, *k2tog, yo, k3; rep from * to end.
8. *K3, p2; rep from * to last 2 sts, k2.
9. Cast on 5 sts @ beg of the row, K1, K2tog, yo, *k3, k2tog, yo; rep from * to last 4 sts, k4. 22 sts 
10. Cast on 5 sts @ beg of the row, P1, *k3, p2; rep from * to last st, k1. 27 sts 
11-13 Knit
14. Cast on 5 sts @ beg of the row, K to end. 32 sts 
15. Cast on 5 sts @ beg of the row, K to end. 37 sts
16. After completing row 15, start over with row 1 of the 16-row-stitch pattern, and work rows 1-16
      4X more. 157 sts 
17. Work pattern rows 1-10. 177 sts.
18. Kfb, K across to last 2 sts, Kfb, K1. 179 sts
19. Knit
20. Repeat 18 & 19 once more. 181 sts
21. Repeat 18 once more. 183 sts
22. Bind off.

 Unblocked measurement: 60” L x 13.5” W
(Lightly) Blocked measurement: 70” L x 14” W


Here is the pattern

Click on the link below, you should be able to download or print from there by clicking on "File".  If this does not work for you you may try switching from Firefox to Internet Explorer or vice versa.  Worst case senario you can copy and paste the directions into a word doc and print it out.  Enjoy!

https://drive.google.com/file/d/0B_oZ8-XeMq3pdm5aU3JpLW5xRzQ/view?usp=sharing

Back to Pattern Index


Saturday, September 14, 2013

Free Knitting Pattern! Wiggle Lace Scarf

  I call this one the "Wiggle Lace" Scarf.  It is a simple 4 row pattern repeat


 Materials Needed:

1 skein of worsted weight yarn, approx. 200 yds.
Size 10 1/2 (6.5mm) circular Knitting needle.  You will use a circular not to knit in the round, but to work flat and accomodate the large number of stitches.  I used a 29" length.

Abbreviations:
K = Knit
P=Purl
CO = Cast on
YO = Yarn over
K2tog = Knit 2 together

Gauge: 

3.5 sts per 1 inch

References:

Cast on at beginning of the row, otherwise known as knitted cast-on.  Tutorial here:
http://www.youtube.com/watch?v=rdaZTBOJ7XU

Directions:

1. CO 8 sts using long-tail cast on method.
2. Knit

3.  (RS) *K2, P1, YO, K2tog, P1; rep from * to last 2 sts, K2.
4.  CO 6 sts at the beg. of the row, P2, *K1, P2; rep from *.
5.  CO 6 sts at the beg. of the row, *K2, P1, K2tog, YO, P1, rep from * to last 2 sts, K2.
6.  P2, *K1, P2; rep from *

7.  Repeat rows 3 - 6 until you have 188 sts.
8.  Bind off as K2, P1.

My finished and (lightly) blocked scarf measured 68" L x 10" W.

Pattern can be downloaded, see at the bottom of this post (after all the photos).


Here is the pattern

Click on the link below, you should be able to download or print from there by clicking on "File".  If this does not work for you you may try switching from Firefox to Internet Explorer or vice versa.  Worst case senario you can copy and paste the directions into a word doc and print it out.  Enjoy!

https://docs.google.com/file/d/0B_oZ8-XeMq3pU1RjeHFlbHdOeDg/edit?usp=drive_web

Back to Pattern Index

Tuesday, September 10, 2013

New Knitting Pattern! Quite Simply...Scarf


 ©2013 Kris Basta

My last three scarves (on this blog) are all constructed similarly with easy pattern repeats.  This is the same but with only a 1 row repeat worked over and over.  Super simple, easy enough for the most beginner, AND good looking enough that even the more advanced knitter will enjoy whipping one up. 

Here it is: 


Materials: 

I skein of worsted weight yarn, approx. 200 yds.  
Size U.S. 10 1/2 (6.5mm) circular knitting needle.  You will use a circular needle not to knit in the round, but to work flat and accomodate the large number of stitches.  I used a 29" length. 
2 stitch markers 


Abbreviations: 

K= Knit
P = Purl
CO = Cast on
YO = Yarn over
PM = Place Marker
RM = Remove Marker
K2tog = Knit 2 sts together


References:

Cast on at the beginning of the row, otherwise known as knitted cast-on.  Tutorial video here: http://www.youtube.com/watch?v=rdaZTBOJ7XU

Gauge:

14 sts in Garter st = 4"

Directions:

1. Using long-tail cast on, cast on 4 sts.
2. Knit
3. CO 4 sts at the beg of the row, knit to end.
4. Repeat step 3 until there are 36 sts.
5. CO 4 sts at the beg of the row, K16, PM, K1, *YO, K2tog, repeat from * twice more, K17.
6. CO 4 sts at the beg of the row, K16, PM, K1, *YO, K2tog, repeat from * to 1 st before marker, K1, RM, K16. 
7. Repeat step 6 until you have 192 sts.
8. CO 4 sts at the beg of the row, K across removing marker as you come to it. 196 sts.
9. Repeat step 8.  200 sts.
10. Do not cast on at the beg of the row(s), Knit 2 rows.
11. Bind off loosely.


1. 


Here is the pattern

 Click on the link below - You should be able to download or print from there by clicking on "File".  If this does not work for you you may try switching from Firefox to Internet Explorer or vice versa.  Worst case senario you can copy and paste the directions into a word doc and print it out.  Enjoy!

https://docs.google.com/file/d/0B_oZ8-XeMq3pdE1kRUpxWVNRTFU/edit?usp=drive_web

Back to Pattern Index

Friday, September 6, 2013

Free Knitting Pattern! Jefferson Scarf


 The Jefferson Scarf

©2013 Kris Basta  


This is Scarf #3 of the series of 3 scarves celebrating the beauty that is Montana.  See Ravelry and other blog pages for the Gallatin and the Madison scarves too!  All three scarves are quite simple, but quite beautiful, and work up very fast. There is a link, after all the photos, so you can download the pattern at the end of this posting.


 Gauge:  

17 sts per 4 inches in stitch pattern #2 


Materials: 

One circular needle U.S. size 10.5 (6.5mm).  You will use this circular not to knit in the round, but to work flat and accommodate the large number or stitches.  I used a 29" length.
1 Skein of worsted weight yarn, approx. 200 yds.


Abbreviations: 

yo = yarn over     KFB = Knit in front & back of st
K = Knit               K2tog = knit 2 together
P = Purl               beg = beginning
BO = bind off


References: 

Cast on at beginning of the row, otherwise known as the knitted cast-on.  Tutorial video is here: 
 http://www.youtube.com/watch?v=rdaZTBOJ7XU


Directions:


1.  Using long tail cast-on, CO 4 sts. 
2.  K1, yo, k2tog, k1.
3.  CO 4 sts at the beg of the row, K1, *yo, k2tog, rep from * to last st, end K1.                        
     (This is stitch pattern #1.)  8 sts. 

4.  Repeat row 3 until there are 96 sts. 

5-8  CO 4 sts at the beg of the row, Knit across.  112 sts. 
9.  CO 4 sts at the beg of the row, K28, KFB, K58, KFB, K28.  118 sts. 

You will now start stitch pattern #2. 

10. CO 4 sts at the beg of the row, K2, *P2, K2, rep from * to end. 
11. CO 4 sts at the beg of the row, P2, *keeping yarn at front of work, sl 2 sts purlwise, P2; rep from * to end. 

12.  Repeat 10 & 11 until you have 198 sts. 
13. CO 4 sts at the beg of the row, K across.  202 sts.
14. Repeat 13 for two more rows.  210 sts. 
15. Knit across (do not cast on 4 sts at beg of the row).
16. Bind off loosely. 

My scarf measured 62" L x 9" W unblocked.  This scarf works up relatively quick and would make great gifts or craft show items.  As with all my patterns feel free to make and sell as many as you like. 

Enjoy!

Kris 

See my Pattern Store here on Craftsy: http://www.craftsy.com/user/360172/pattern-store 
or here on Ravelry: http://www.ravelry.com/stores/kris-basta---kriskrafter-llc-designs


"The Jefferson River is a tributary of the Missouri River approximately 83 miles long.  From broad valleys to a narrow canyon, the Jefferson River passes through a region of significant geological diversity, with some of the oldest and youngest rocks in North America and a diversity of igneous, metamorphic, and sedimentary formations.  The Lewis and Clark expedition first ascended the river in 1805.  Much of its scenic beauty and wildlife diversity remains today."


Here is the pattern 

Click on the link below, you should be able to download or print from there by clicking on "File".  If this does not work for you you may try switching from Firefox to Internet Explorer or vice versa.  Worst case senario you can copy and paste the directions into a word doc and print it out.  Enjoy!

https://docs.google.com/file/d/0B_oZ8-XeMq3pYndaSzBFTG0tWTA/edit?usp=drive_web

Back to Pattern Index