Monday, March 28, 2011

NEW! 2-Needle Felted Slippers Pattern


New 2-Needle Felted Slippers Pattern on my website!
Not a fan of double points? or just looking for a super fast project? Need a gift in a day's notice? This pattern is for you! These slippers are not knit in the traditional slipper manner - sort of sock-like you simply knit flat, folded and stitched, it couldn't be any easier! Make 2 color, 3 color, striped, whatever your hearts desire. Felting instructions included AND I'll tell you my top-secret way of making a non-slip sole (shhh!). Knit with a regular set of #8 knitting needles and worsted weight wool yarn. Below are a few that I just made - I will be posting more pics soon.
Pattern is found on my website: http://www.kriskrafter.com/ez2feslpa.html


I'm a Craftsy Designer

Thursday, March 10, 2011

Machine Knitting - Felted Slippers Pattern- SINGLE strand

For my Machine Knitting friends here is my "recipe" for making felted wool slippers on my Bulky Knitting Machine. My machine is a Brother KH-260, tension is set at 7.
I used a variety of leftover worsted weight wool. Mostly gotten from Micheals or thrift stores. This pattern is written in very basic form and assumes that the maker is a fairly experienced Machine knitter so I don't go into detail about how to ewrap cast-on, make a heel, etc.
___________________________
Here is how I made them:
Cast on 27 sts.with e-wrap cast on using your cuff color.
Knit 6 rows in cuff color (or you could use your garter bar and do garter stitch for 6 rows. Don't have a garter bar?.......well, I happen to know where you can get one! (wink)
change to heel color and knit your heel, short rowing down to 11 sts then increasing back up to all stitches in work.
change to bottom foot color and knit 40 rows.
change to toe color and knit toe same as heel
change to top foot color and knit 40 rows
Knit 6 rows in cuff color and then bind off.

I sewed the seam on my sewing machine with as small a seam allowance as possible 1/8" or so, but you can also sew the sides shut using mattress stitch.
I felted mine in my top-loader washing machine. Finally, trim up any furry wool, shape it by putting it on your foot (I know, it's cold, wet and yucky but you want to get a perfect fit to your foot), now set it aside to air dry. Enjoy! I would love to see slippers that others make.
***For those wanting a thicker version of this pattern, see in my blog that I posted a version of this pattern using DOUBLE strands of yarn. I also sell a hand-knit version of this on my website. Happy Knitting!
_____________________________www.kriskrafter.com   Back to Pattern Index
Indian blanket slippers

Indian blanket slippers


red 'n black

red 'n black

Yellow & white slippers


Yellow & white slippers

Thursday, February 3, 2011

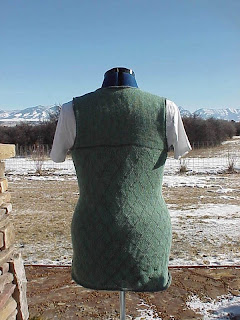
Machine Knit "sort-of sideways" tunic top


I am so tickled with these tunics! I knit the bottom half as one long sideways panel. I then sewed the ends together making a tube (this is the body part of the tunic). I picked up stitches and knit the front bodice, then picked up stitches and knit the back bodice.
I used 2 strands of thin yarn and used a plaiting pattern on my Brother 965i. -this could be done with a punchcard machine as well. Very very easy and I love how all 3 turned out!

Back to Pattern Index
___________________________
Here is how I made it - this worked up to fit me - 36” bust, 39” at hip. I steamed it to shape.
Tension 9+
I used 2 strands of fairly thin yarn (2/24 ish)
e-wrap Cast on 130 stitches
Knit in plaited tuck stitch of choice for 365 rows
bind off.

Fold this newly knit piece in half and sew together with as small
of a seam as you can.

Mark 2 1/2” on each side of seam you just made. Note that the fold
side is now your other “side” ofyour sweater - mark 2 1/2” from
each side of your fold as well.

BACK
RC000
____
Knit in Plaited Stockinette stitch.
Pick up and hang 84 stitches between your two marks. Knit 4 rows, dec
1 stitch each end. Knit 2 rows, dec 1 stitch each end 3x. You are now
knitting on 76 stitches.** Knit to row 72. Remove 28 stitches at center
(for back of neck) to waste yarn. Remove 24 right shoulder stitches to
waste yarn. Remove 24 left shoulder stitches to waste yarn.

FRONT
RC000
_____
Knit the same as the back until ** Knit to row 36, remove center 18 stitches
to waste yarn. Put needles left of 0 in hold position. You will now
knit the shoulder and neck shaping on the right side. Decrease 1 stitch
each side, every row, 5x. Knit to row 72. Remove right shoulder (24
stitches) to waste yarn.
Make sure row counter is reset to row 36,
Knit left side the same way as you had knit the right.

Armhole ribbing
_______________
Pick up and hang 130 stitches around right armhole, make sure that your
wrong side faces you when you do this. Knit 1 row at tension 9+, Knit
3 rows at tension 8, Knit 2 rows at tension 7, bind off.

Knit left side armhole ribbing the same way.

Neckhole ribbing
________________
First you must join one shoulder seam - doesn’t matter which one but
only join one shoulder. Once you have joined one shoulder seam, with
wrong side facing you, pick up and hang 115 stitches. (do not accidentally
pick up and hang the other shoulder seam - you will join this last).
Once you have hung your neckhole, Knit 1 row at 9+ tension, Knit 3
rows at tension 8, Knit 2 rows at tension 7, Bind off.

Join second shoulder seam.

weave all loose ends in.
Steam or block
WEAR IT!

Friday, December 31, 2010


I just made this purse from an old jacket I had in the closet. About 5 years ago my sister and I were in a little boutique in Springfield, Illinois and saw these jackets. We both loved them and both bought one. The other day she was saying she never wears hers and I said "yeah, I never wear mine either". I said that I thought the jacket would make a cute purse and that I'd give it go - if it turned out I said I make her one too. What do ya think? I think it turned our REALLY cute!

Wednesday, September 22, 2010

Here are the pattern pcs. for the oven mitts, you simply click on each pattern piece, it will show you it enlarged and you can then print it out........ See below in next post for Instructions. Hope you enjoy!


Free Felted Oven Mitt Pattern!


Felted Oven Mitts
Using old Wool Sweater ~ by Kriskrafter


Materials:
100% Wool Sweater(s)
Matching thread
Pins
Sewing Machine
Ribbed cuff (optional)
~~~~~~~~~~~~~~~~~~~~~~~~~~~~~~~~~~~~~~~~
These are super simple to make and people love receiving them as gifts, they also make fabulous Craft Show sellers.
First Cut out the provided pattern pieces A & B, and tape them together as indicated.
Next, lay your sweater out smoothly and cut out 4 of the Mitt pattern. If you want the oven mitts to be multiple color then use more than one sweater. Just make sure that the sweaters are similar in their thickness and stitch count so that they will felt similarly. I like to use sweaters that are between 4 – 7 stitches per inch. If the sweater is too tightly knit it will not felt very well, if it is knit too loose it is hard to cut out and keep the stitches from unraveling.
The way this pattern works is that 2 pcs will be the back of the hand, 2 pcs will be the front of the hand. I use 2 layers for each so that it felts up nice and thick and offers plenty of protection when pulling out hot items from the oven. Arrange your layers the way you want them to be with the inside 2 pcs being your “right” sides.
Sew all 4 thicknesses together with a ¼” seam. Check your seam after you’ve sewn it to make sure you’ve stitched through all 4 layers. Now stitch all the way around the bottom of the mitten so that you stitch the open ends together.
Throw in the washing machine to felt. I use my top-loader washing machine, set for a regular cycle. When it begins to agitate I stand over it and watch. I keep pulling the oven mitt out to check it and re-set my washer to agitate more if I need it. Mine usually needs 3 agitation cycles to felt it but every washer is different. When you have the Oven Mitt felted to the size you want, remove the mitt from the washer (DO NOT let the oven mitt run through the remainder part of the wash cycle), squeeze out the excess water, roll in a towel to blot out extra water then shape it and let it air dry.
Cuff: Sew on a ribbed cuff of your choice. I like to use the ribbing that was on the sweater (un-felted), as it matches nicely.
Extra decoration: If you want to dress it up a bit and perhaps embroider some flowers or other designs, make sure you use only wool or cotton yarns/threads as these will be heat resistant. Synthetics of any kind will melt.
Enjoy!

Back to Pattern Index

Tuesday, August 24, 2010

Garter Bars & Needle Stoppers for Machine Knitters!

I have been selling my newly manufactured Garter Bars since May and they have sold very well with great reviews. We are now happy to announce that we have Needle stoppers to use in conjunction with the garter bars. Don't know what a needle stopper is? Here is a short video showing a few uses for needle stoppers.
VIDEO HERE
Keep checking the website as we will also be introducing mini (20-stitch) garter bars very soon!
For more information/pricing/ordering, go to:
www.kriskrafter.com


happy knitting!
Kris